
I’m too cheap to buy a proper battery
** This post was edited on 9th June 2016 as a result of feedback provided by comments posted at http://hackaday.com/2016/06/02/safely-creating-a-li-ion-pack-from-phone-cells/ **
This is a write up of how I made up a very cheap 1000mAh battery pack to run a couple of devices for my quadcopter flying, namely my RC Controller and my FPV headset.
Normally such devices would be run from small Lithium Polymer batteries. But, “Li-po” batteries tend to be a bit more expensive. and are not really needed for such low drain scenarios ( Li-Po can provide very high current drain needed to fly quacopters for instance) and they are very easy to discharge to the point where your pack becomes damaged and it can be dangerous to recharge a damaged pack
To prevent deep discharge your device needs to have a low battery warning feature. My RC controller has, but my headset does not. Even with a low battery warning it’s still possible to leave the unit unattended, miss the alarm and flatten/ruin the battery
I figured a Lithium ion pack would be cheaper to make and fix if i accidentally ruined a cell with over discharge, so I decided to put my own together out of mobile phone batteries.
I searched Ebay for the absolute cheapest standard phone battery i could find and came up with the Nokia BL-4U for just 99p delivered! These look to be legit. Note the Nokia hologram.
Beware of ultra cheap unbranded batteries off Ebay. They can vary somewhat and your batteries should all have a similar resistance if you are going to build them into a pack. Three of these and a couple of small connectors means a pack that costs about £3.20 to put together
Two connectors ? well one is the main power connector for powering your device. the other is a balanced charge connector which allows each cell of the pack to be monitored and charged using an appropriate balanced charger such as the Turnigy “AccuCell 6” or “AccuCell 8” ( other brands are available)
Danger, Danger, Will Robinson !
Before i explain the build, the usual warnings. I present this purely for those who might find it interesting, I do not advise you do it
- Batteries can be dangerous. ( lithium batteries more so)
- Over charging can cause it to combust
- Short circuiting can cause it to combust.
- Looking at it in funny way can cause it to combust…
I may have made that last one up. I don’t want to scare you too much. Li-Ion Mobile phone batteries are “relatively” safe (Li-Po batteries on the other hand are whole other level of potential hazard) The mobile phone cell is usually framed in a strong plastic “skeleton”, it is wrapped in thick metal foil as a fire protection and includes thermal and electrical cut-outs which will kill the power from the battery if anything unusual is detected.
However meddling with them, as I do here, can cause them to become unsafe. So please heed the following warnings:
- The battery terminals are closely spaced and recessed into the plastic. You need a fine tipped soldering iron to get in there.
- You need to avoid heating it for too long, you can damage the battery, you can also melt the plastic around the housing ruining you solder connection and potentially causing a short circuit if you melt away the insulation between the contacts
- In case of battery fire, always work in a well ventilated place, preferably out side or with easy access to outside.
- Always have something to hand, such as tongs/pliers, ready to pick up and move a burning battery.
- If you do have a battery fire, place it in, either a “Li-po Safe” which is a strong fibreglass pouch ( available from ebay) or a metal container/bucket and leave outside to burn itself out.
- NOTE: This pack cannot delivery enough current to fly a quadcopter. It is only for low current drain devices.
OK, dire warnings over, on with the build…
Components:
- 3 x Nokia BL-4U 1000mAh batteries – Sourced from Ebay for 99p each
- Very thin packing foam sheet – I get loads of components delivered wrapped in this stuff.
- Some sticky backed plastic – I used polyester printer labels.
- JST-XH 4 way plug – If you don’t have the Crimps, Connectors and Crimping tool to make the plug, you can buy balanced plugs ready crimped with flying leads ready to solder from ebay
- Some heavier but flexible wire for the main positive and negative charge/discharge wires
- A power connector suitable for what you want to power eg. XT-60 XT-30 , Deans etc
- masking tape or sellotape/Scotch tape.
Wiring
Although they are called phone “batteries” they really are just a single Cell, a battery is really a collection of cells. So from now on I’m going to refer more correctly to the individual Nokia batteries as “Cells” and the overall pack as the Battery.
Each cell has three contacts, marked:-
– Negative
o Sensor ( on some batteries this is marked “T”)
+ Positive
For this project only the + and – contacts will be used. The “sensor” or Thermistor pin is used by the phone to monitor the thermal state of the cell
The pack is made from three cells wired in series with balanced charger configuration according to this diagram:
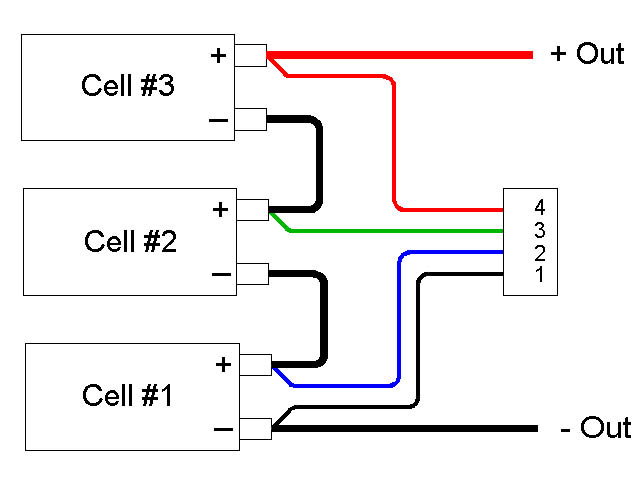
If you bought a balanced charge connector ready wired, the colour codes on your wires may not be the same as in the diagram. If so, ignore the colours and stick to the pinout numbers. Pin 4 must always go to positive pin of the pack. Pin 1 must always go to negative (if you buy your connector already crimped pin 4 can often be green instead of black!)
Soldering
The order of these connections is crucial or you may fry your balance charger or Battery monitor
- Solder your chosen battery connector onto the main power wires first in order to keep the power wires separated and safe. If you forget to do this and end up soldering them afterwards (as i did) remember to keep the wires isolated as you solder them. Strip, solder and heat-shrink each wire separately BEFORE STARTING THE OTHER. If you accidentally touch the wires together, or bridge the connectors with your soldering iron tip, the short circuit will release a lot of current in one go. There is a danger of electrical burns from the sparks and / or starting a battery fire.
- Twist the battery connector wires together with the appropriate balance connector wires and solder each of them to the appropriate cell, One to the negative of the first cell, the other to the positive of the last cell.
- Solder the battery interconnects between the 1st, 2nd and 3rd along with the remaining balance wires.
That’s as much detail as I’m going to go into. If you can’t follow that diagram you probably shouldn’t be attempting this!
Soldering tips:
- I quickly tinned each contact first.
- Then twisted and tinned the wires that were going in them. Clip them short so when they are soldered in you have no exposed wire showing
- I then remelted the tinned contacts while pushing the tinned wire into it
- You need to be quick with these solder connections. I popped the thermal fuse on one of the cells just trying to solder to it on my first attempt. I fortunately had a spare.
Before encasing the pack test its voltages!
If you have balance charger or battery tester you should get between 3v & 4.2v per cell. If some cells are reading double what is expected, you have you balanced charge wires crossed. If a cell reads zero you either have the wires crossed, a bad connection or you have popped a thermistor during soldering. Measure each cell directly with a multimeter to make sure each is providing a voltage.
Building the pack
Assuming you have wired everything up correctly you can now start building the pack.
Stack the cells with foam sheet in between each one.
![IMG_0039[1]](http://www.makerspace.org.uk/files/2016/05/IMG_00391.jpg)
I alternated mine front to back to keep the contacts well away from each other. You can have all the leads coming out of one side of the battery, or the main wires out of one side and the balance connector out of the other. Lay the wires as neatly as you can without any contacts touching each other,
![IMG_0040[1]](http://www.makerspace.org.uk/files/2016/05/IMG_00401.jpg)
Wrap the whole pack in a layer of foam and tape down with masking tape
Wrap the outside in self adhesive plastic; Polyester or vinyl. Printer labels are perfect for this. ( yes, i know my battery tester in this picture is incorrectly set on Li-Po 😉 )
Finally mark the pack with it’s Battery type “Li-Ion” and nominal voltage “11.1v” and retest with a suitable meter to make sure no connections have snapped.
Across the main power wires you should have between 9v – 12.6v depending on the charge state of the cells you started with. If you have less than this or no voltage at all you may have a bust cell.
Charging the pack
- The advised charge rate of a Li-ion Cell is between half (0.5C) and 1 (1C) times the cell rating. These cells are 1000mAh which makes the calculation very easy, between 500mA and 1000mA . ( For a phone battery this falls nicely between the rated output of a USB port and some of the more powerful USB wall chargers).
- Optimum charge rate for Li-ion is 0.8C. that works out at 800mA for a 1000mAh cell.
- The cells should remain cool during charge if kept within these parameters.
That’s it.
Get pack, wear pack, fly…
Glen